

写在前面
工作的项目是个门户项目,调了七七八八的外系统几百个接口,但从没向外提供过接口,所以一直都是写 WebService 客户端代码,还不清楚服务端到底怎么个玩法
这就抽空学习下 WebService 的服务端、客户端都有哪些写法
工具
- Eclipse Oxygen
- JDK 1.8
- axis 1.4
- axis2 1.7.6
- soapUI 3.6
服务端
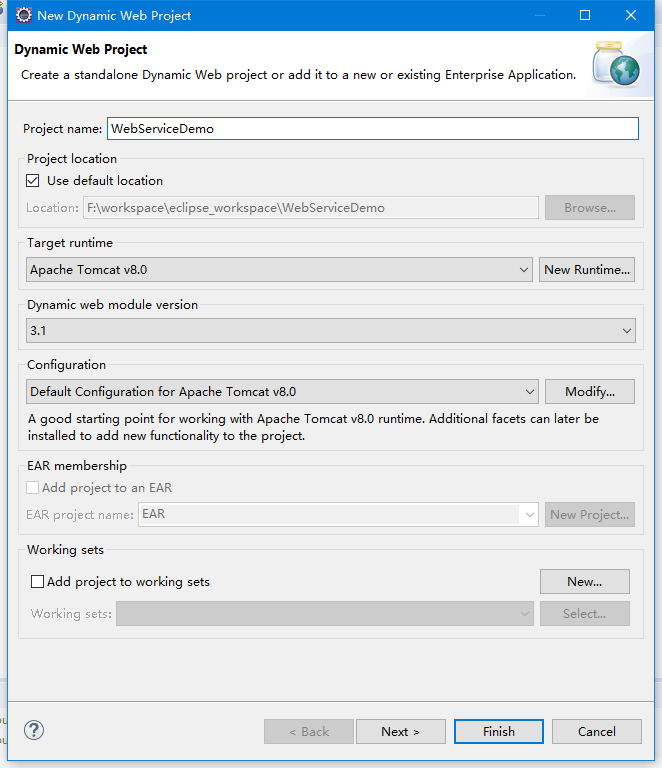
1. 新建 Dinamic Web Project
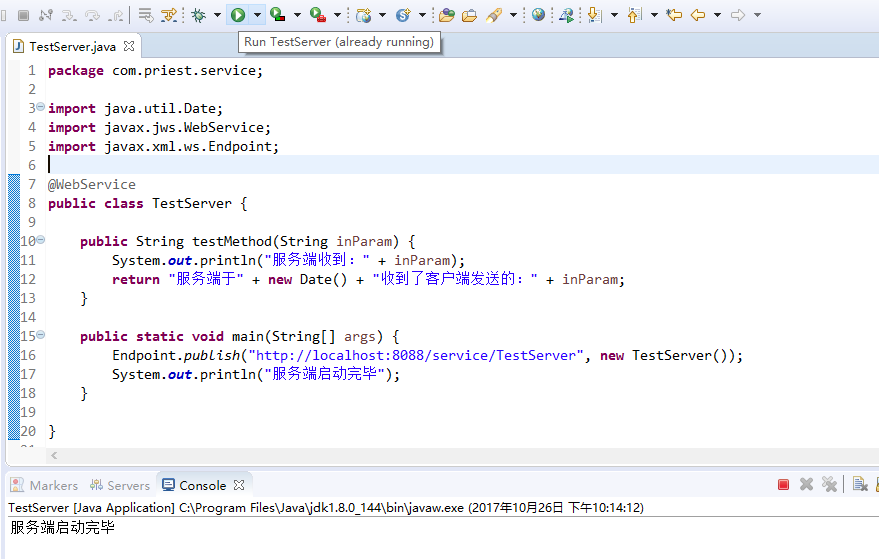
2. 新建服务端测试类
这里使用了 JAX-WS 发布服务端,注意要给类加上 @WebService 注解
package com.priest.service;

import java.util.Date;
import javax.jws.WebService;
import javax.xml.ws.Endpoint;

@WebService
public class TestServer {

	public String testMethod(String inParam) {
		System.out.println("服务端收到:" + inParam);
		return "服务端于" + new Date() + "收到了客户端发送的:" + inParam;
	}

	public static void main(String[] args) {
		Endpoint.publish("http://localhost:8088/service/TestServer", new TestServer());
		System.out.println("服务端启动完毕");
	}

}
3. 启动工程
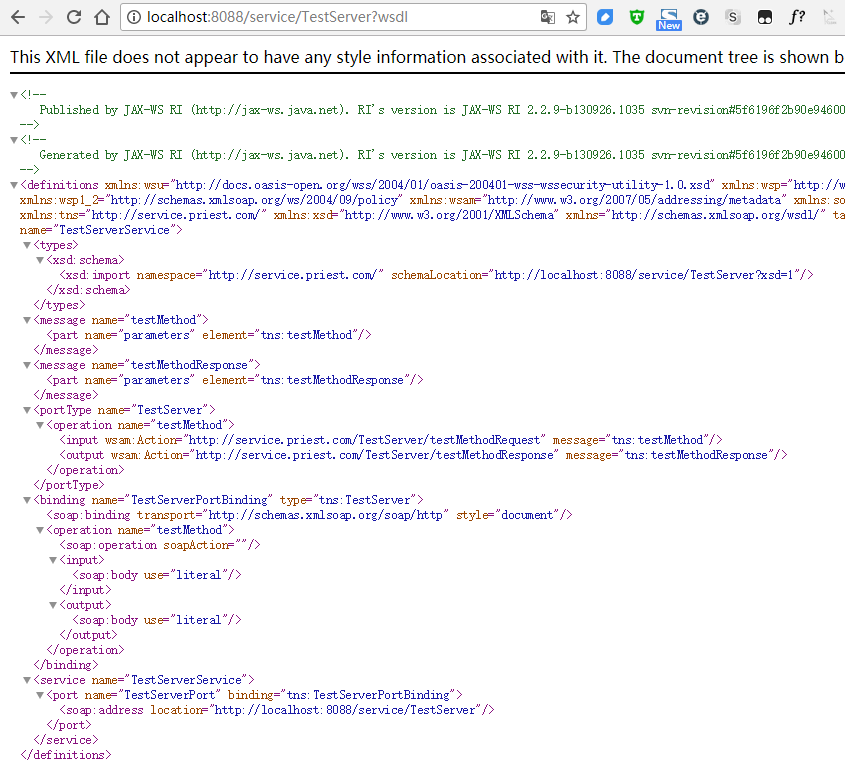
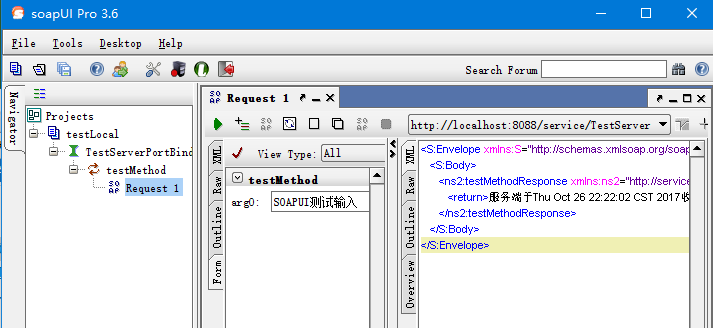
4. 测试服务
4.1 浏览器查看
4.2 soapUI测试
服务端完成,接下来以各种方式写客户端代码
客户端1
1. 使用 wsimport 生成客户端
使用 java 自带的 wsimport 命令:
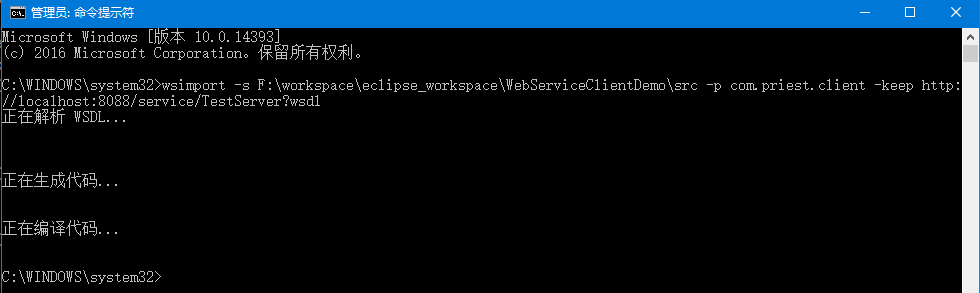
wsimport -s F:\workspace\eclipse_workspace\WebServiceClientDemo\src -p com.priest.client -keep http://localhost:8088/service/TestServer?wsdl
-s 指定源码目录
-p 指定生成的包路径
-keep 保留生成的文件
测试了下,这个 -keep 加不加好像没什么区别?
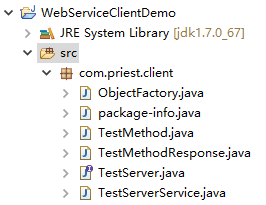
2. 查看生成的客户端类
3. 写客户端测试类
package com.priest.client;

public class TestClient1 {

	public static void main(String[] args) {
		TestServerService service = new TestServerService();
		TestServer ts = service.getTestServerPort();

		String result = ts.testMethod("客户端1测试");
		System.out.println("客户端1测试的结果:\n" + result);
	}

}
4. 执行调用

客户端2
1. 使用 wsimport 生成客户端
同客户端1,这里需要借用 wsimport 生成的客户端类
2. 写客户端测试类
package com.priest.client;

import java.net.URL;

import javax.xml.namespace.QName;
import javax.xml.ws.Service;

public class TestClient2 {
	public static void main(String[] args) {
		try {
			URL url = new URL("http://localhost:8088/service/TestServer?wsdl");
			QName qname = new QName("http://service.priest.com/", "TestServerService");
			Service service = Service.create(url, qname);
			TestServer ts = service.getPort(TestServer.class);
			String result = ts.testMethod("客户端2测试");
			System.out.println("客户端2测试的结果:\n" + result);
		} catch (Exception e) {
			e.printStackTrace();
		}
	}
}
3. 执行调用

客户端3
1. 引入 axis 1.4 的 jar 包
从官网下载 axis-bin-1_4.zip
项目中需要引入的 jar 包至少是这些:
- axis.jar
- jaxrpc.jar
- commons-logging-1.0.4.jar
- commons-discovery-0.2.jar
- wsdl4j-1.5.1.jar
2. 写客户端测试类
package com.priest.client2;

import java.net.URL;

import javax.xml.namespace.QName;

import org.apache.axis.client.Call;
import org.apache.axis.client.Service;

public class TestClient3 {

	public static void main(String[] args) {
		try {
			//服务地址
			URL url = new URL("http://localhost:8088/service/TestServer");
			//命名空间
			String nameSpace = "http://service.priest.com/";
			//方法名
			String method = "testMethod";

			Service service = new Service();
			Call call = (Call) service.createCall();

			call.setOperationName(new QName(nameSpace, method));
			call.setTargetEndpointAddress(url);
			call.setTimeout(3000);
			call.addParameter("arg0", org.apache.axis.Constants.XSD_STRING, javax.xml.rpc.ParameterMode.IN);
			call.setReturnType(org.apache.axis.Constants.XSD_STRING);

			String result = (String) call.invoke(new Object[] {"客户端3测试"});
			System.out.println("客户端3测试结果:\n" + result);
		} catch (Exception e) {
			e.printStackTrace();
		}
	}
}
3. 执行调用

有个警告,是:
Unable to find required classes (javax.activation.DataHandler and javax.mail.internet.MimeMultipart). Attachment support is disabled.
需要引入 mail.jar 和 activation.jar,不过不引也不会对 webservice 调用有影响
客户端4
1. 使用 axis.jar 生成客户端
详细步骤参考这篇博客
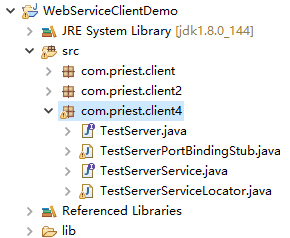
2. 查看生成的客户端类
3. 写客户端测试类
package com.priest.client4;

public class TestClient4 {

	public static void main(String[] args) {

		try {
			//重新指定url是为了防止本地客户端代码是旧的,而对方迁了服务地址
			String url = "http://localhost:8088/service/TestServer";
			TestServerServiceLocator locator = new TestServerServiceLocator();
			locator.setTestServerPortEndpointAddress(url);
			TestServerPortBindingStub stub = (TestServerPortBindingStub) locator.getTestServerPort();
			stub.setTimeout(3000);
			String result = stub.testMethod("客户端4测试");
			System.out.println("客户端4测试结果:\n" + result);
		} catch (Exception e) {
			e.printStackTrace();
		}
	}

}
4. 执行调用
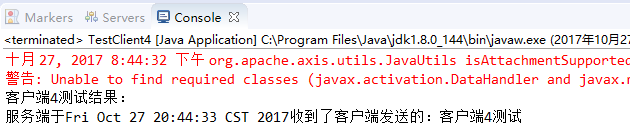
报错内容和上面 客户端3 章节里的一样,因为缺了两个 jar 包
2017-10-29 更新补充 ↓
客户端5
1. 引入 axis2 的 jar 包
从官网下载 axis2-1.7.6-bin.zip
项目中需要引入的 jar 包至少是这些:
- axiom-api-1.2.20.jar
- axiom-impl-1.2.20.jar
- axis2-adb-1.7.6.jar
- axis2-jaxws-1.7.6.jar
- axis2-kernel-1.7.6.jar
- axis2-transport-http-1.7.6.jar
- axis2-transport-local-1.7.6.jar
- commons-codec-1.2.jar
- commons-httpclient-3.1.jar
- commons-logging-1.1.1.jar
- httpcore-4.4.4.jar
- neethi-3.0.3.jar
- woden-core-1.0M10.jar
- wsdl4j-1.6.2.jar
- xmlschema-core-2.2.1.jar
2. 写客户端测试类
package com.priest.client5;

import javax.xml.namespace.QName;

import org.apache.axis2.addressing.EndpointReference;
import org.apache.axis2.client.Options;
import org.apache.axis2.rpc.client.RPCServiceClient;

public class TestClinent5 {

	public static void main(String[] args) {
		try {
			String url = "http://localhost:8088/service/TestServer";
			String namespace = "http://service.priest.com/";
			String method = "testMethod";
			Object[] inParam = new Object[] {"客户端5测试"};
			Class[] returnType = new Class[] { String.class };
			Object[] ret = null;

			RPCServiceClient serviceClient = new RPCServiceClient();
			Options options = serviceClient.getOptions();
			EndpointReference targetURL = new EndpointReference(url);
			options.setTo(targetURL);
			QName opQName = new QName(namespace, method);

			ret = serviceClient.invokeBlocking(opQName, inParam, returnType);
			String result = (String) ret[0];
			System.out.println("客户端5测试:\n" + result);
		} catch (Exception e) {
			e.printStackTrace();
		}
	}

}
这里使用 RPC 客户端的方式调用
3. 执行调用

客户端6
1. 引入 axis2 的 jar 包
同上面客户端5
2. 写客户端测试类
package com.priest.client6;

import org.apache.axiom.om.OMAbstractFactory;
import org.apache.axiom.om.OMElement;
import org.apache.axiom.om.OMFactory;
import org.apache.axiom.om.OMNamespace;
import org.apache.axis2.addressing.EndpointReference;
import org.apache.axis2.client.Options;
import org.apache.axis2.client.ServiceClient;

public class TestClient6 {

	public static void main(String[] args) {
		try {
			EndpointReference targetEPR = new EndpointReference("http://localhost:8088/service/TestServer");
			OMFactory factory = OMAbstractFactory.getOMFactory();
			OMNamespace nameSpace = factory.createOMNamespace("http://service.priest.com/", "tns");
			OMElement method = factory.createOMElement("testMethod", nameSpace);
			//因服务端没有为入参设置命名空间,所以此处用null
			OMElement inParam = factory.createOMElement("arg0", null);
			inParam.setText("客户端6测试");
			method.addChild(inParam);

			Options options = new Options();
			options.setTo(targetEPR);
			ServiceClient axiomClient = new ServiceClient();
			axiomClient.setOptions(options);

			OMElement retOM = axiomClient.sendReceive(method);
			String result = retOM.getFirstElement().getText();
			System.out.println("客户端6测试:\n" + result);
		} catch (Exception e) {
			e.printStackTrace();
		}
	}

}
这次使用 axiom 的方式调用
3. 执行调用

客户端7
1. 使用 axis2 的 eclipse 插件生成客户端代码
下载安装插件 及 生成客户端代码的步骤见这篇博客
2. 查看生成的客户端类
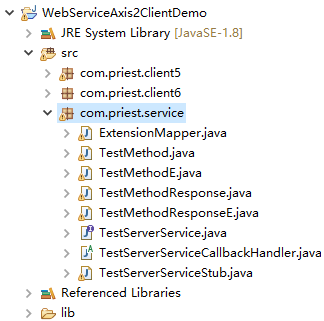
服务端开放的方法(testMethod) 及对应的返回(testMethodResponse) 都生成了两个,以 E 为结尾的那个是由于服务端不是用 AXIOM 的方式写及开放的,自动生成时为了使用 axis2 的 OMElement,对 testMethod 和 testMethodResponse 做了一点”封装”(这么说不准确,但目前还不清楚这种生成现象的原理,学习到了再回来修改完善)
3. 写客户端测试类
package com.priest.service;

public class TestClient7 {
	public static void main(String[] args) {
		try {
			TestServerServiceStub stub = new TestServerServiceStub();
			TestMethodE testMethodE = new TestMethodE();
			TestMethod testMethod = new TestMethod();
			testMethod.setArg0("客户端7测试");
			testMethodE.setTestMethod(testMethod);

			TestMethodResponseE respE = stub.testMethod(testMethodE);
			TestMethodResponse resp = respE.getTestMethodResponse();
			String result = resp.get_return();

			System.out.println("客户端7测试:\n" + result);
		} catch (Exception e) {
			e.printStackTrace();
		}
	}
}
4. 执行调用

最后
本文参考:
http://www.cnblogs.com/FlyingPuPu/p/5335138.html
https://yq.aliyun.com/articles/17285
http://blog.csdn.net/liwf_/article/details/20864517?utm_source=tuicool&utm_medium=referral
http://www.cnblogs.com/Johness/archive/2013/04/19/3030392.html
http://blog.csdn.net/jiangyu1013/article/details/75662707
http://tzz6.iteye.com/blog/2269229
http://www.cnblogs.com/demingblog/p/3264688.html
http://danlley.iteye.com/blog/102164
http://www.cnblogs.com/earl86/archive/2008/11/04/1666481.html
http://www.xuebuyuan.com/1311482.html
http://www.cnblogs.com/564085446java/p/3932520.html
http://blog.csdn.net/wangchangpen62/article/details/45171001
http://blog.163.com/zjm123_0/blog/static/1204004272009111715036432/