写在前面
了解到现在 Spring Boot 开发项目非常方便,能省去很多很多配置,所以学着写了一个Demo。主要用了 Spring Boot2、MySQL、JPA。
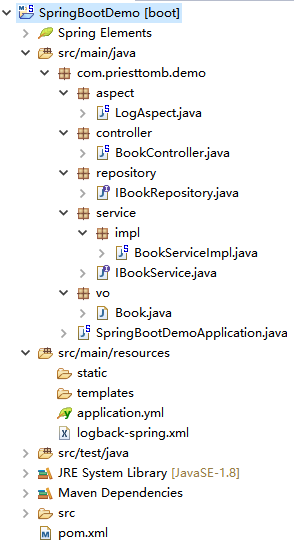
项目结构
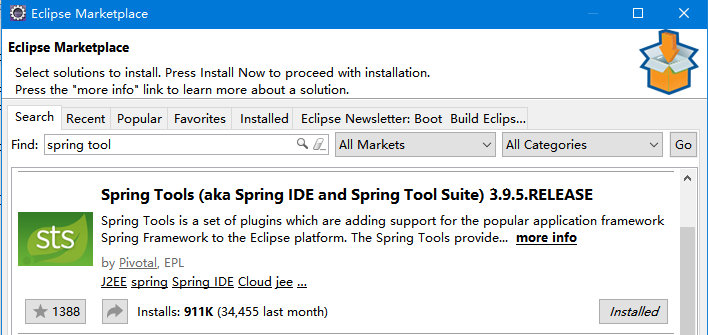
IDEA 现在可以直接新建 SpringBoot 工程,Eclipse 的话,暂时还是需要自己安装插件,就是这个 Spring Tools
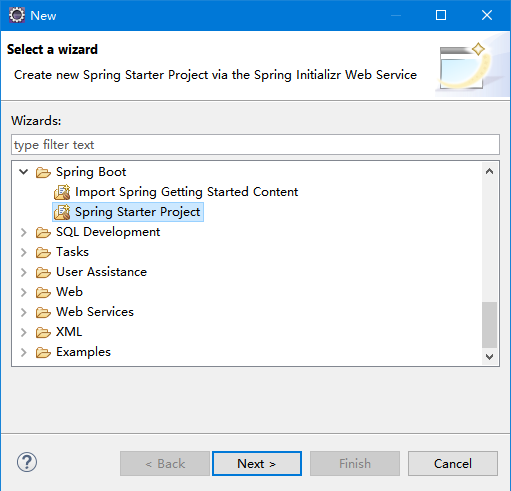
搜索安装后就可以直接新建 Spring Boot 工程了
这是最终的项目结构:
主要代码配置
源码全部丢 github 上去了,可以点这里查看
下面列一些主要的代码和配置
0. application.yml
spring:
  datasource:
    driver-class-name: com.mysql.jdbc.Driver
    url: jdbc:mysql://127.0.0.1:3306/SpringBootDemo?autoReconnect=true&useSSL=false&useUnicode=true&characterEncoding=utf-8
    username: root
    password: mysql

  jpa:
    hibernate:
      ddl-auto: update
    show-sql: true
相比原来的 properties 文件,yml 用起来更简便一些,功能都是一样的。
这里的 spring.jpa.hibernate.ddl-auto 配置了 update,可以在启动项目时根据我们配置的 VO 类自动建表、更新表结构。
1. SpringBootDemoApplication.java
package com.priesttomb.demo;

import org.springframework.boot.SpringApplication;
import org.springframework.boot.autoconfigure.SpringBootApplication;

@SpringBootApplication
public class SpringBootDemoApplication {

	public static void main(String[] args) {
		SpringApplication.run(SpringBootDemoApplication.class, args);
	}
}
这个 application 类,就是 Spring Boot 项目的启动入口,不需要像原来那样把工程部署在 Web 服务器上再启动了,因为 Spring Boot 已经内置了 tomcat。
2. BookController.java
package com.priesttomb.demo.controller;

import java.util.List;

import org.springframework.beans.factory.annotation.Autowired;
import org.springframework.web.bind.annotation.DeleteMapping;
import org.springframework.web.bind.annotation.GetMapping;
import org.springframework.web.bind.annotation.PathVariable;
import org.springframework.web.bind.annotation.PostMapping;
import org.springframework.web.bind.annotation.RequestParam;
import org.springframework.web.bind.annotation.RestController;

import com.priesttomb.demo.service.IBookService;
import com.priesttomb.demo.vo.Book;

@RestController
public class BookController {

	@Autowired
	private IBookService bookService;

	/**
	 * 添加一本书
	 * @param name 书名
	 * @param price 书价格
	 * @return 新书
	 */
	@PostMapping(value = "/book")
	public Book addBook(@RequestParam(value="name") String name,@RequestParam(value="price") Integer price) {
		Book book = new Book(name, price);
		return bookService.saveBook(book);
	}

	/**
	 * 获取所有的书
	 * @return
	 */
	@GetMapping(value = "/book")
	public List<Book> getAllBooks() {
		return bookService.getAllBooks();
	}

	/**
	 * 根据书的id获取书
	 * @param id
	 * @return
	 */
	@GetMapping(value = "/book/{id}")
	public Book getBookById(@PathVariable("id") Integer id) {
		return bookService.getBookById(id);
	}

	/**
	 * 根据书的id删除书
	 * @param id
	 */
	@DeleteMapping(value = "/book/{id}")
	public void delBookById(@PathVariable("id") Integer id) {
		bookService.delBookById(id);
	}

	/**
	 * 根据书名查书
	 * @param name
	 * @return
	 */
	@GetMapping(value = "/book/name/{name}")
	public Book findByName(@PathVariable("name") String name) {
		//return bookService.findBook(name);
		return bookService.findByName(name);
	}
}
随便写了几个方法,这里实现了所谓的 RESTful 服务,就是按照标准,用不同的 HTTP 请求做不同的操作:
-
用 HTTP GET 获取资源
-
用 HTTP POST 创建资源
-
用 HTTP PUT 更新资源
-
用 HTTP DELETE 删除资源
3. IBookRepository.java
package com.priesttomb.demo.repository;

import org.springframework.data.jpa.repository.JpaRepository;
import org.springframework.data.jpa.repository.Query;
import org.springframework.data.repository.query.Param;
import org.springframework.stereotype.Repository;

import com.priesttomb.demo.vo.Book;

@Repository
public interface IBookRepository extends JpaRepository<Book, Integer>{

	//JPA对方法名解析,可以自动生成HQL查询
	Book findByName(String name);

	@Query("from Book b where b.name=:name")
	Book findBook(@Param("name") String name);
}
继承 JpaRepository,然后就可以直接使用常用的方法了,比如 findAll、findById、save、deleteById 之类的
除此之外,JPA 还能解析方法名(前提是写的规范),自动生成 HQL 查询,或者直接用 @Query 来写 JPQL,先简单尝试了下,后面有时间再详细学下这个东西【挖坑
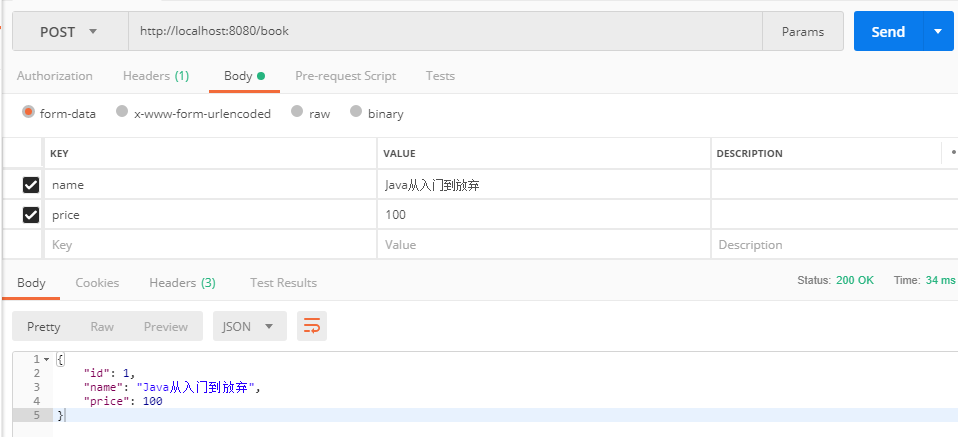
运行测试
emm 用了 Postman,可以方便的选择使用哪种 HTTP 请求,以及设置请求的 Body 内容。
比如: